

Kubernetes, often abbreviated as K8s (since there are 8 letters between 'K' and 's' in Kubernetes), is like a Swiss Army knife for managing containerized applications. 🛠️ It automates deployment, scaling, and management of these applications, allowing you to focus more on your app and less on the underlying infrastructure. Let's dive into how you can hop on the Kubernetes train and get it up and running!
What is Kubernetes? 🤔
At its core, Kubernetes is a container orchestration platform. It helps you run and manage containers, which are lightweight, standalone, executable packages that include everything needed to run a piece of software, including the code, runtime, libraries, and dependencies. Containers allow you to package your application with all of its dependencies into a standardized unit for software development.
Why Use Kubernetes? 🚀
Imagine you have a fleet of containers running your application. Kubernetes helps you:
Scale your application up or down to handle varying loads.
Deploy new versions of your application without downtime.
Manage storage, networking, and other infrastructure components for your containers.
Automate tasks like rolling updates, health checks, and self-healing.
What is a Kubernetes Cluster Architecture?
A Kubernetes cluster is a set of nodes that are grouped together to run containerized applications. These nodes can be physical machines or virtual machines running in the cloud. At a minimum, a Kubernetes cluster consists of a master node and one or more worker nodes. K8s cluster is manage by CNI (Container Network Interface).
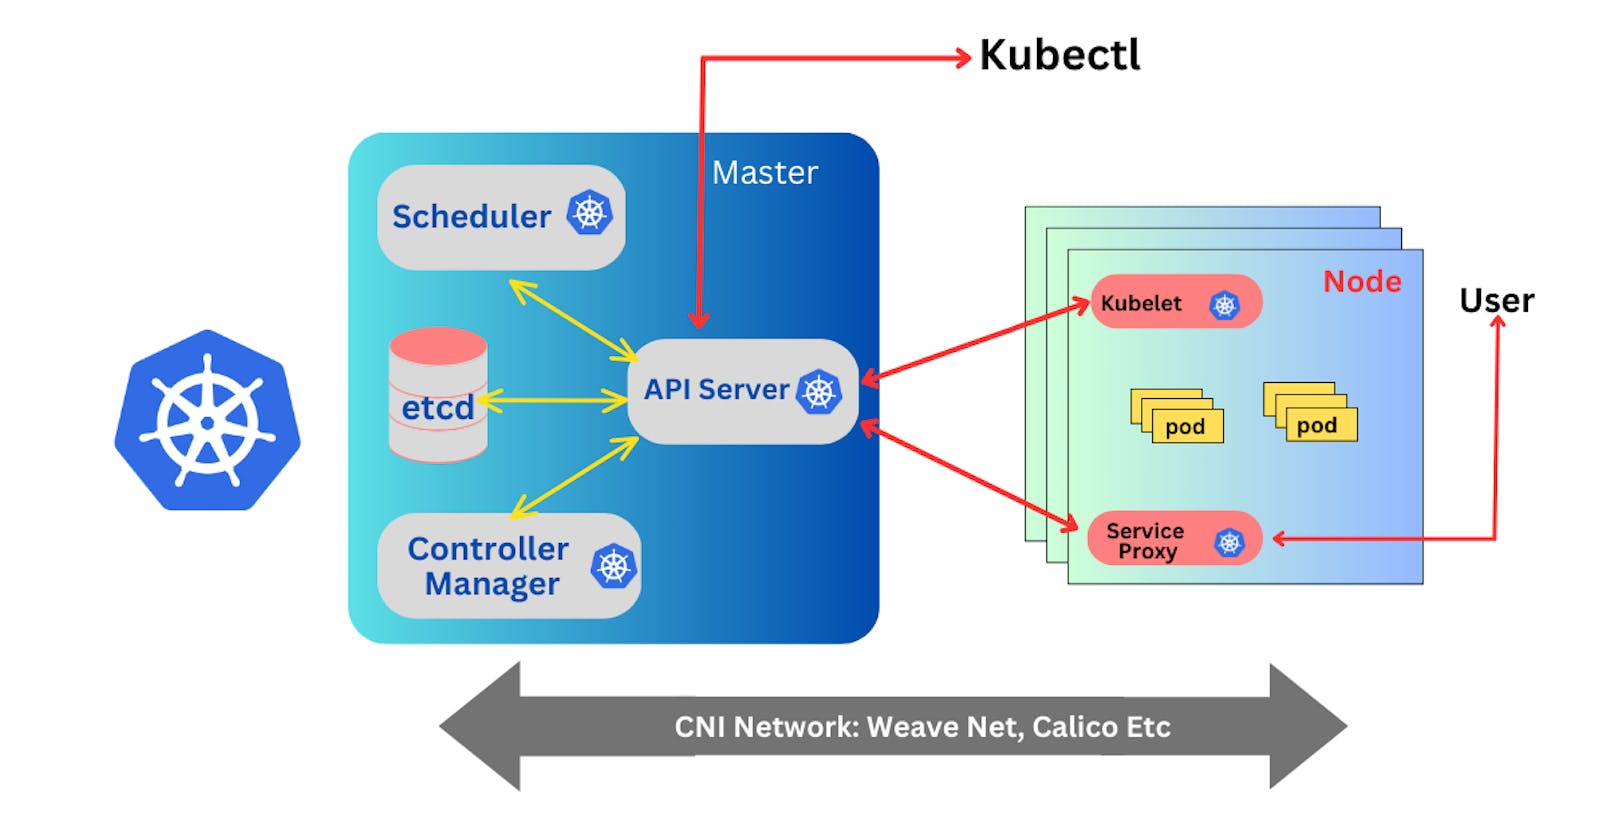
Master Node:
The master node is responsible for managing the cluster. It schedules applications, maintains the desired state of the cluster, and monitors the health of the nodes and applications. There are 4 main services of master node:
API Server
Scheduler
etcd
Controller Manager
Worker Node:
Worker nodes are where your applications run. Each worker node has a container (Pod) runtime, such as Docker, that runs the containers that make up your application. There are 2 main services of worker node:
Kubelet
Service Proxy
Installation Guides🤖:
Minikube:
Following are the step-by-step instructions for installing Minikube on Ubuntu. Minikube allows you to run a single-node Kubernetes cluster locally for development and testing purposes.
Pre-requisites
Ubuntu OS
sudo privileges
Internet access
Virtualization support enabled (Check with
egrep -c '(vmx|svm)' /proc/cpuinfo, 0=disabled 1=enabled)
Step 1: Update System Packages
Update your package lists to make sure you are getting the latest version and dependencies.
sudo apt update
Step 2: Install Required Packages
Install some basic required packages.
sudo apt install -y curl wget apt-transport-https
Step 3: Install Docker
Minikube can run a Kubernetes cluster either in a VM or locally via Docker. This guide demonstrates the Docker method.
sudo apt install -y docker.io
Start and enable Docker.
sudo systemctl enable --now docker
Add current user to docker group (To use docker without root)
sudo usermod -aG docker $USER && newgrp docker
Now, logout (use exit command) and connect again.
Step 4: Install Minikube
First, download the Minikube binary using curl:
curl -Lo minikube https://storage.googleapis.com/minikube/releases/latest/minikube-linux-amd64
Make it executable and move it into your path:
chmod +x minikube
sudo mv minikube /usr/local/bin/
Step 5: Install Kubectl
Download kubectl, which is a Kubernetes command-line tool.
curl -LO "https://dl.k8s.io/release/$(curl -L -s https://dl.k8s.io/release/stable.txt)/bin/linux/amd64/kubectl"
Make it executable and move it into your path:
chmod +x kubectl
sudo mv kubectl /usr/local/bin/
Step 6: Start Minikube
Now, you can start Minikube with the following command:
minikube start --driver=docker
This command will start a single-node Kubernetes cluster inside a Docker container.
Step 7: Check Cluster Status
Check the cluster status with:
minikube status
You can also use kubectl to interact with your cluster:
kubectl get nodes
Step 8: Stop Minikube
When you are done, you can stop the Minikube cluster with:
minikube stop
Optional: Delete Minikube Cluster
If you wish to delete the Minikube cluster entirely, you can do so with:
minikube delete
That's it! You've successfully installed Minikube on Ubuntu, and you can now start deploying Kubernetes applications for development and testing.
Kubeadm:
Following are the steps needed to set up a Kubernetes cluster using kubeadm on AWS.
Pre-requisites
Ubuntu OS (Xenial or later)
sudo privileges
Internet access
t2.medium instance type or higher
Run the following commands on both the master and worker nodes to prepare them for kubeadm.
# using 'sudo su' is not a good practice.
sudo apt update
sudo apt-get install -y apt-transport-https ca-certificates curl
sudo apt install docker.io -y

sudo systemctl enable --now docker # enable and start in single command.

# Adding GPG keys.
curl -fsSL "https://packages.cloud.google.com/apt/doc/apt-key.gpg" | sudo gpg --dearmor -o /etc/apt/trusted.gpg.d/kubernetes-archive-keyring.gpg

# Add the repository to the sourcelist.
echo 'deb https://packages.cloud.google.com/apt kubernetes-xenial main' | sudo tee /etc/apt/sources.list.d/kubernetes.list

sudo apt update
sudo apt install kubeadm=1.20.0-00 kubectl=1.20.0-00 kubelet=1.20.0-00 -y
Master Node Configuration:
- Initialize the Kubernetes master node.
sudo kubeadm init
After succesfully running, your Kubernetes control plane will be initialized successfully.
- Set up local kubeconfig (both for root user and normal user):
mkdir -p $HOME/.kube
sudo cp -i /etc/kubernetes/admin.conf $HOME/.kube/config
sudo chown $(id -u):$(id -g) $HOME/.kube/config
- Apply Weave network:
kubectl apply -f https://github.com/weaveworks/weave/releases/download/v2.8.1/weave-daemonset-k8s.yaml
- Generate a token for worker nodes to join:
sudo kubeadm token create --print-join-command
Expose port 6443 in the Security group for the Worker to connect to Master Node
Worker Node Configuration:
- Run the following commands on the worker node.
sudo kubeadm reset pre-flight checks
- Paste the join command you got from the master node configuration (Step 4) and append
--v=5at the end. Make sure either you are working as sudo user or usesudobefore the command.
Verify Cluster Connection
On Master Node:
kubectl get nodes
Optional: Labeling Nodes
If you want to label worker nodes, you can use the following command:
kubectl label node <node-name> node-role.kubernetes.io/worker=worker
Optional: Test a demo Pod
If you want to test a demo pod, you can use the following command:
kubectl run hello-world-pod --image=busybox --restart=Never --command -- sh -c "echo 'Hello, World' && sleep 3600"